미드저니 V5 사용 방법
미드저니가 V5로 판올림 되었다!
결과물의 차이가 아주 드라마틱하게 업그레이드 되었다!
V5 버전을 쓰려면
/settings 에서
MJ version5을 기본으로 선택해주면 된다!

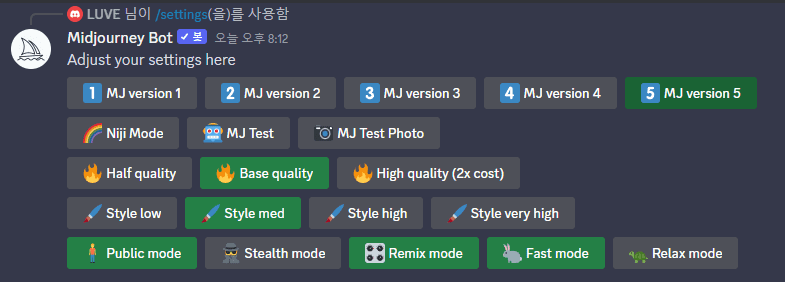
아니면 프롬프트에서 항상 명령어 –v 5를 붙여 넣으면 된다!
아래가 V4
Close-up of the face of a gentleman man in his 30s among many people passing by on a city street, Cinematic, Hyper-detailed, insane details, Beautifully color graded, Unreal Engine, DOF, Super-Resolution, Megapixel, Cinematic Lightning, Anti-Aliasing, FKAA, TXAA, RTX, SSAO, Post Processing, Post Production, Tone Mapping, CGI, VFX, SFX, Insanely detailed and intricate, Hyper maximalist, Hyper realistic, Volumetric, Photorealistic, ultra photoreal, ultra- detailed, intricate details, 8K, Super detailed, Full color, Volumetric lightning, HDR, Realistic, Unreal Engine, 16K, Sharp focus–v testp

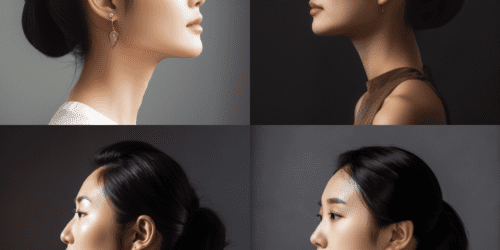
아래가 V5
Close-up of the face of a gentleman man in his 30s among many people passing by on a city street, Cinematic, Hyper-detailed, insane details, Beautifully color graded, Unreal Engine, DOF, Super-Resolution, Megapixel, Cinematic Lightning, Anti-Aliasing, FKAA, TXAA, RTX, SSAO, Post Processing, Post Production, Tone Mapping, CGI, VFX, SFX, Insanely detailed and intricate, Hyper maximalist, Hyper realistic, Volumetric, Photorealistic, ultra photoreal, ultra- detailed, intricate details, 8K, Super detailed, Full color, Volumetric lightning, HDR, Realistic, Unreal Engine, 16K, Sharp focus–v testp 16K, photorealistic, ultra realistic, Cinematic light, detailed, unreal engine5 –v 5

확연히 차이가 나네~